Blanket Yarn Butterfly Wall Hanging - Free Pattern
- Kristen Bell
- Sep 28, 2025
- 6 min read

Updated: Dec 3, 2025
Got extra blanket yarn lying around? Same. Maybe you bought a whole skein just to finish one tiny detail on an amigurumi project, and now that random color has been gathering dust in your stash ever since.
Or maybe you went all in on plushie-making, stocked up on blanket yarn, and then realized... you’re not quite the amigurumi artist you thought you’d be (calling myself out here).
Either way, I’ve got a solution: butterfly wall hangings! They use less than 20 yards of yarn, work in any color combo, and—bonus!—they’re ridiculously cute (just picture them in a nursery).
So let’s bust our stashes and add a little handmade texture to our walls!
PIN NOW, MAKE IT LATER

A free pdf version is also available on my Ko-fi shop.
You can scroll to the bottom of this post for a free pdf download!
FYI - Ko-fi has all of my free patterns as well as many paid patterns listed at a cheaper price than those on my Etsy shop.
Note: This pattern uses US Terminology.

Materials:
8.0 mm hook
Scissors and tapestry needle
Bernat Blanket Yarn or equivalent weight yarn (Super Bulky/6) in the color Dark Teal (10 yds)
Bernat Blanket Yarn or equivalent weight yarn (Super Bulky/6) in the color Vintage White (< 5 yds)
Floral Wire and Wire Cutters (optional but recommended)
Stitch Markers
Abbreviations and Required Stitches:
CH - Chain
SC - Single Crochet
FO - Fasten Off
RS - Right Side
WS - Wrong Side
St - Stitch
Sl St - Slip Stitch
Sc2tog - Single crochet together/ Single crochet decrease
Additional Notes:
Using the Yarn Under/Yarn Over (YU/YO) method can help keep the tension tight and avoid holes in your work.
The butterfly can be crocheted with or without the floral wire. Keep in mind the project may not hang as intended if floral wire is not used.
Attaching a stitch marker to the starting chain when crocheting is recommended to keep track of wing orientation.
Turn your work at the end of each row. The CH 1 and Turn does not count as a stitch.
“2SC” means place 2 single crochet in the same stitch
“SC 6” means place 1 single crochet into each of the next 6 stitches.
The total number of stitches is listed between [x]
Crochet the Wings!


Top Right Wing:
Using Dark Teal, CH 7
Row 1: SC second CH from hook, SC 4, 2SC. CH 1 and Turn. [7]
Row 2: SC 6, 2SC. CH 1 and Turn. [8]
Row 3: 2SC, SC 7. CH 1 and Turn. [9]
Row 4: Sc2tog, SC 6, 2SC. CH 1 and Turn. [9]
Row 5: SC 9. CH 1 and Turn. [9]
Row 6: Sc2tog, SC 6, 2SC. CH 1 and Turn. [9]
Row 7: SC 7, Sc2tog. CH 1 and Turn [8]
Row 8: Sc2tog, SC 6. CH 1 and Turn. [7]
Row 9: SC 4, (Sl St) in the next 3 stitches, FO.
Top Left Wing:
Using Dark Teal, CH 7
Row 1: 2SC second CH from hook, SC 5. CH 1 and Turn. [7]
Row 2: 2SC, SC 6. CH 1 and Turn. [8]
Row 3: SC 7, 2SC. CH 1 and Turn. [9]
Row 4: 2SC, SC 6, Sc2tog. CH 1 and Turn. [9]
Row 5: SC 9. CH 1 and Turn. [9]
Row 6: 2SC, SC 6, Sc2tog. CH 1 and Turn. [9]
Row 7: Sc2tog, SC 7. CH 1 and Turn [8]
Row 8: SC 6, Sc2tog. CH 1 and Turn. [7]
Row 9: (Sl St) in the next 3 stitches, SC 4, FO.
Bottom Right Wing:
Using Dark Teal, CH 5
Row 1: SC second CH from hook, SC 2, 2SC. CH 1 and Turn. [5]
Row 2: SC 4, 2SC. CH 1 and Turn. [6]
Row 3: SC 5, 2SC. CH 1 and Turn. [7]
Row 4: SC 7. CH 1 and Turn. [7]
Row 5: SC 5, Sc2tog. CH 1 and Turn. [6]
Row 6: Sc2tog, SC 2, Sc2tog. CH 1 and Turn. [4]
Row 7: Sc2tog, (Sl St) in the next 2 stitches, FO.
Bottom Left Wing
Using Dark Teal, CH 5
Row 1: 2SC second CH from hook, SC 3. CH 1 and Turn. [5]
Row 2: 2SC, SC 4. CH 1 and Turn. [6]
Row 3: 2SC, SC 5. CH 1 and Turn. [7]
Row 4: SC 7. CH 1 and Turn. [7]
Row 5: Sc2tog, SC 5. CH 1 and Turn. [6]
Row 6: Sc2tog, SC 2, Sc2tog. CH 1 and Turn. [4]
Row 7: (Sl St) in the next 2 stitches, Sc2tog, FO.
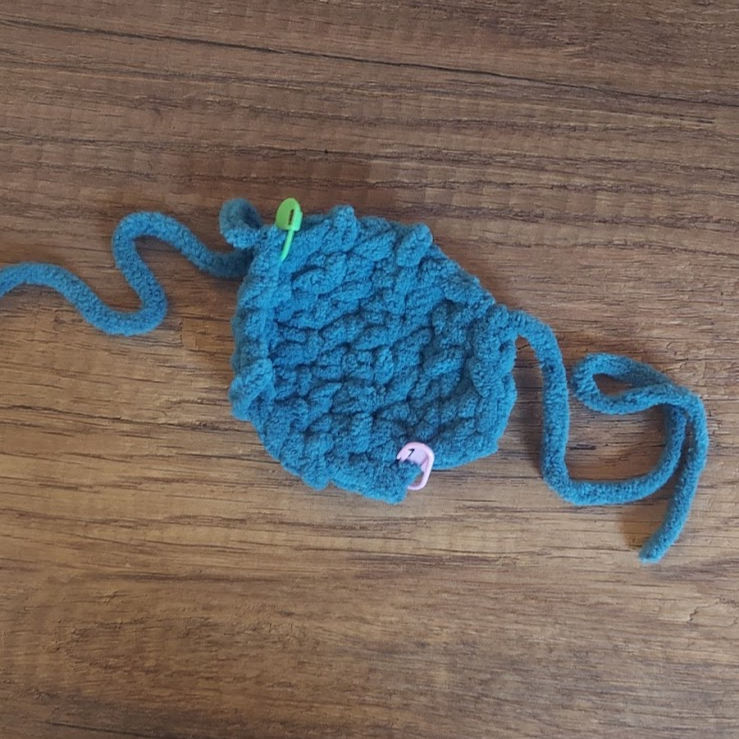
Wing Arrangement
Before adding the single crochet border, lay out the four wing sections. The orientation of
each piece is shown in the image below. The bright green stitch markers indicate the
location of the starting chain. All pieces are placed with the right side (RS) facing up.
It is recommended to add stitch markers to the outer corner of each panel at this point
(pink is used in the image below). It may also be helpful to use a contrasting color in the
inner corner of each piece.

Adding Single Crochet Border to Wing Sections:
Cut a length of floral wire equal to the full perimeter of the Top Right Wing piece PLUS a few inches of wiggle room.
Holding the wire along the edge of the stitches (right side facing you), attach the color Vintage White to the inner corner of the Top Right Wing piece.


Single crochet in each stitch/row around each piece, carrying the floral wire along so it wraps the section. Add additional stitches at each corner to accommodate the turn. Some deformation is expected, which helps with the definition of the wings.


Note: Be sure to remove and replace the stitch markers in the same location on the single crochet border as you crochet to keep track of the wing orientations.
When you reach the beginning of the round, Sl St into the first single crochet and Fasten Off. Twist the two ends of the floral wire together.
Repeat this process with the other three wing sections.
Attaching The Wings and Crocheting the Body:
The body extends about 8 stitches along the centerline of the wings (see Image A). Cut a wire slightly over 3 times the length of the body. Fold the wire over three times and twist, leaving a loop extended at one end for hanging (see Image B).


To form the body of the butterfly, attach the color Vintage White to the Lower Wing pieces about four stitches below the inner corner, right side facing you (Image C). Single crochet to attach up to the inner corner. You will see the top of the stitch when you look at the front of the butterfly. Do not fasten off.
Hold the top wings together and continue single crocheting the pieces together (see Image D) 4 stitches up the centerline. Fasten off.


Turn the butterfly to the backside. Fold over the wires from the wings to hide the sharp ends and twist all the wires together (see Image E). Fold over and hide by sewing along the body of the butterfly (see Image F).


Starting at the centerline, sew the Top Right and Bottom Right Wing pieces together.
Sew horizontally until the wings start to turn away from each other, about 4 stitches.
Repeat with the Top and Bottom Left Wing pieces (see Image G).
Weave in ends.

Antennae (optional):


(1) Cut two equal lengths of wire about 9 inches long.
(2) Fold over the top of a wire and apply tacky glue to tip.
(3) Place Vintage White yarn on glue and tightly wrap around the length of the wire.
(4) Cut yarn.
Repeat with other wire.
Sew the antennae along the body to the backside so that the top 4 inches stick out above the butterfly. Weave in ends.


Finished!
Thank you for using my pattern! If you post your WIP or finished piece to Instagram, please tag me @kb_reads_and_makes_things

Download a free PDF of this pattern!
This pattern and all photos are property of KB Reads and Makes and any reproduction or selling of the content and/or photos in part or in whole is prohibited.
This pattern has been through the testing process, but mistakes slip through! If you find any errors or need clarification, please email me at kbreadsandmakes@gmail.com


.png)

Comments